
One Day Only Deal
Once you’ve decided what kinds of projects you want to turn on your lathe, you need to start looking at the most important accessories you will need to get under way.
Most lathes come with a spur drive, faceplate and live centre as standard accessories. The spur drive and the faceplate are attached to the headstock and effectively turn the stock while the live centre supports the workpiece at the tailstock.
Spur drive
A spur drive is used most often to turn spindles (workpieces where the grain direction runs horizontally and parallel to the lathe bed). Spindles can be chair or table legs, lamp stands or handles. The spur drive is driven into the centre of a square or round piece of wood to be turned. The opposite side of the piece will be held by a live centre at the tailstock end.

Fig. 1: JET Mini Lathe 4 Toothed Spur Drive with MT2

Fig. 2: A spindle workpiece correctly setup in the lathe. Note that the spurs have been driven a couple of millimetres into the workpiece to ensure that workpiece cannot slip during turning.
Crown drive
The crown drive is an additional accessory not usually supplied with the lathe. It has the advantage of having a centre pin that is spring loaded and teeth around the perimeter that are much sharper than the small blades on the spur drive making it much easier to insert into the end of the workpiece securely.

Fig. 3: Creative Turning Crown Drive diameter 1" with MT2 shaft. The serrated shape of the teeth in a crown drive allows for easier re-positioning when compared to a spur drive.
Dead Centre
A dead centre is essentially a friction drive when used in the headstock. The dead centre turns the workpiece because of the friction caused by the pressure exerted around its tip. It is sometimes preferred for beginners as the workpiece will simply slip if the turning chisel catches the workpiece. Not surprisingly it has limited holding power, however it works well with smaller work pieces.
Dead centres were more commonly used in the tailstocks of older lathes before the advent of the live centre. In this instance it was important for the workpiece to spin on the tip of the dead centre. To aid slipping grease or some other lubricant would be applied.

Fig. 4 A dead centre with MT 2.
Live Centre
In most modern lathes, the tailstock is equipped with a live centre which fits in the Morse Taper socket. The live centre has a bearing assembly with a conical point on the other end that is free to spin. This enables you to lock the workpiece securely between headstock and the tailstock while allowing the workpiece to spin freely.

Fig. 5: The Toolcraft Live Centre with a MT 1
Faceplate
Using a faceplate to mount a workpiece to the headstock is one of the safest ways to attach it to the spindle. The faceplate is attached by screws into the centre of one end of the workpiece and is threaded onto the headstock spindle. The wood can be supported entirely by the faceplate although it will be safer it is also supported by the tailstock, especially when the wood is unbalanced during the initial turning phase.

Fig. 6: The Creative Turning Faceplate 150mm FP-150-1¼" x 8TPI

Fig. 7: A bowl being turned using a faceplate to attach it to the lathe.
4-Jaw Scroll Chuck

Fig. 8: The Creative Turning Chuck 3.7 Chuck with 1"x 8tpi
A scroll chuck is by far the most versatile method of holding a workpiece on the lathe and is invaluable for bowl turning. It can hold in either expansion mode in a mortice or compression mode on a tenon. It should be noted that neither the mortice nor the tenon should be more than 10% smaller or larger than the closed jaw size (the reason is explained below).
The first consideration when purchasing a four-jaw chuck for turning wood bowls is the size of the bowls you will be turning.
A rule of thumb is that the base of the bowl should be no smaller than 30 to 40 percent of the size of the bowl diameter. In other words a 250 mm diameter bowl should have approximately a 75 mm – 100 mm tenon or mortice on the base.
In the 30 to 40 percent base to diameter ratio, the four-jaw chuck will perform well and provide ample support and stability. A 75 mm tenon on a 500 mm bowl would not offer enough support for stability.
The reason the mortice or tenon must not be bigger than 10% of the closed jaw size is because as the jaws move apart they move out of round and will not be able to hold the workpiece very securely. This is clearly illustrated below.

Fig. 9: Notice how the expanded jaws in the scroll chuck on the right are no longer round.
There should always be a slight gap when closing the jaws down on a tenon in order to apply maximum grip on it. If the tenon is turned a little too small and the jaws all touch, there’s a good chance the tenon will be loose inside the chuck and not securely held. The consequence of this is obvious and highly undesirable.
If the mortice is oversized, say a 100mm mortice is used with a 150mm jaws, the outside rim of the jaws will only be making minimal contact with the circle around the inside edge of the mortice. The ideal sized mortice is just slightly smaller than the four jaws in closed position this should leave a small gap between the 4 jaws once the chuck is snug on the wooden bowl tenon.
Similarly a Tenon should be slightly larger than the than the Jaws in fully closed position,
The jaws of the chuck is in most instances are dovetail shaped while some have a ridge on the inside so it is important to cut the mortice (or tenon) accurately to the shape of the jaws in order to ensure maximum grip. In the case of the mortice base of the jaws should not be flat against the back of the wood itself (see illustrations below).


Fig. 10: Sizing the mortice correctly for the 4-Jaw Scroll Chuck.
Please visit: https://turnawoodbowl.com/make-a-wood-bowl-turning-wood-bowls/
Worm screw
Another way to use the four-jaw chuck to turn a wooden bowl is to hold a worm screw in the chuck which comes with all four-jaw chucks.

Fig. 11: Screwing the workpiece onto a worm screw.
The procedure for installing the worm screw requires the insertion of the tail or knob end of the screw in chuck jaws. The jaws are then tightened while seating the screw chuck in the middle. It may be necessary to wiggle the screw around to find the flat area before tightening the jaw.
A hole will need to be drilled in the base of the workpiece that is the same diameter as the shank of the worm screw.
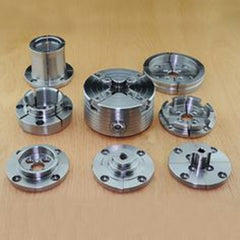
Fig.12: A wide range of accessory jaws are available for applications and are mostly interchangeable.
Please Note:
For details of equipment mentioned in this article please have a look at: www.toolcraft.co.za
Leave a comment